Send Crypto From Coinbase to Ledger Safely 2026
— By Whatsertrade in Tutorials

How to send crypto from Coinbase to Ledger safely: step by step network checks, test transfers, fees, and troubleshooting to protect your funds in 2026.
Sending crypto from Coinbase to Ledger is the point where many beginners move from convenient exchange custody into stronger self-custody. The transfer is not difficult, but it is one of those actions where a small habit difference makes a huge safety difference. If you prepare the Ledger account first and treat the network choice carefully, the move is usually straightforward. If you rush it, the same flow becomes stressful fast.
This guide focuses on the exact search intent: how to send crypto from Coinbase to Ledger safely. It explains the right order, what to verify on the Coinbase send screen, and why a hardware wallet protects keys but does not magically fix a wrong chain or wrong destination decision.
Quick answer
- Open Ledger Live first and make sure the correct asset account is ready to receive funds.
- On Coinbase, match the asset, destination address, and network before confirming the send.
- If this is your first exchange-to-hardware-wallet transfer, use a small test amount before sending size.
Why Users Move Crypto from Coinbase to Ledger
Coinbase is the onboarding point for a lot of retail users because it makes buying and holding simple. Ledger is the next step for users who want stronger control over private keys and less dependence on exchange custody. That makes this transfer one of the most important beginner security actions, not just another app-to-app move.
If you want the exchange overview first, read our Coinbase guide. If you want the hardware-wallet basics first, read our Ledger tutorial.
Coinbase to Ledger checklist
Step 1: Prepare Ledger Live Before You Touch the Coinbase Send Screen
The right sequence matters. Open Ledger Live, install the relevant app if needed, confirm the asset account is ready, and only then use the receive flow to copy the destination address. Starting with the wallet keeps the destination as your source of truth instead of letting the exchange interface define the route for you.
Checks that matter most on Coinbase
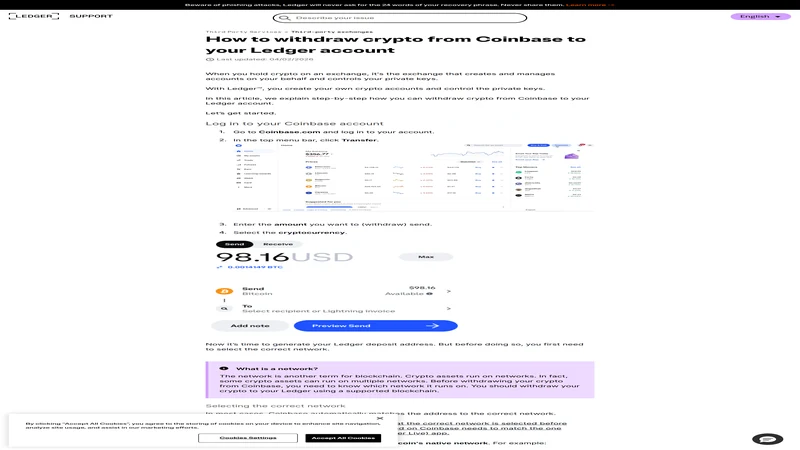
Step 2: Read the Coinbase Preview Screen Slowly
Coinbase tries to make the send flow feel frictionless. That is useful, but it can also encourage users to skim the review screen instead of really reading it. Slow down here. Treat the preview step as the most important page in the whole workflow, because this is where you confirm that the destination matches the hardware wallet account you prepared.
Step 3: Use a Test Transaction If the Value Matters
A test transaction is still worth it for hardware-wallet routes, especially when the asset has multiple chain options or this is your first time moving from Coinbase to Ledger. If the test lands correctly, you can send the rest with much more confidence and much less emotional noise.
Coinbase to Ledger flow
Step 4: Verify the Funds in Ledger Live Before You Store or Move Them Again
After Coinbase shows the transfer as complete, verify the destination balance in Ledger Live. If the funds are not visible right away, first confirm that you are looking at the correct account and chain. Many beginners panic at this stage even though the issue is often just the wrong account view rather than a failed transfer.
Fees, Timing, and Coinbase Send Expectations
Users searching this topic are usually one step away from real self-custody, so they care about cost and timing almost as much as mechanics. Coinbase may show the send cleanly, but that clean interface can hide important differences between assets, networks, and confirmation flows. Some transfers look instant. Others take longer because of network conditions, asset design, or Coinbase review steps.
The practical lesson is simple. Treat fees and timing as part of route quality, not as afterthoughts. A route that is slightly slower but clearly matches your Ledger account is far better than a route that feels fast but leaves you unsure about the destination chain. Security in this workflow is mostly about reducing ambiguity before you click confirm.
Operational checks before moving size
Common Coinbase to Ledger Mistakes to Avoid
Mistakes that create avoidable stress
What to Do If the Transfer Does Not Show Up in Ledger Live
If Coinbase marks the send as complete but the balance does not appear in Ledger Live, start with the boring checks first. Confirm the Coinbase status page or transfer record, then look at the exact account and chain in Ledger Live. A lot of users assume the send failed when the real issue is that they opened the wrong account view or expected the funds under a different network.
If the route details are correct and the on-chain record exists, the problem is often visibility rather than custody. This is one more reason the test-transfer habit matters. It turns the first run into a controlled rehearsal instead of a high-stress guess.
Frequently Asked Questions
Can I send Bitcoin from Coinbase to Ledger?
Yes, as long as you copy the correct BTC receiving address from Ledger Live and review the send carefully before confirming.
Can I send USDT from Coinbase to Ledger?
Yes, but you should be extra careful with network compatibility because stablecoins can exist on multiple chains.
What if the transfer does not show up in Ledger Live right away?
Check Coinbase transfer status first, then confirm that you are viewing the correct asset account and chain in Ledger Live.
How much does it cost to send crypto from Coinbase to Ledger?
The cost depends on the asset, the network being used, and the live Coinbase fee shown during the send flow. Always check the final preview before confirming.
Is a test transfer from Coinbase to Ledger worth it?
Yes. If the route is new or the amount matters, a small test transfer can catch network or destination mistakes before you move the full balance.
Related reading
Disclaimer: This article is for educational purposes only and does not constitute investment, tax, or legal advice. Coinbase send options and Ledger asset support can change over time. Always confirm the live chain, destination address, and account before moving funds.