How to Do a Gasless Swap with UniswapX Without Holding ETH
Being gas-locked with thousands in stablecoins but zero native ETH is a classic DeFi frustration. We explain how UniswapX re-engineers gas overhead.
1. The Financial Core: Intent-Based Architecture Explained
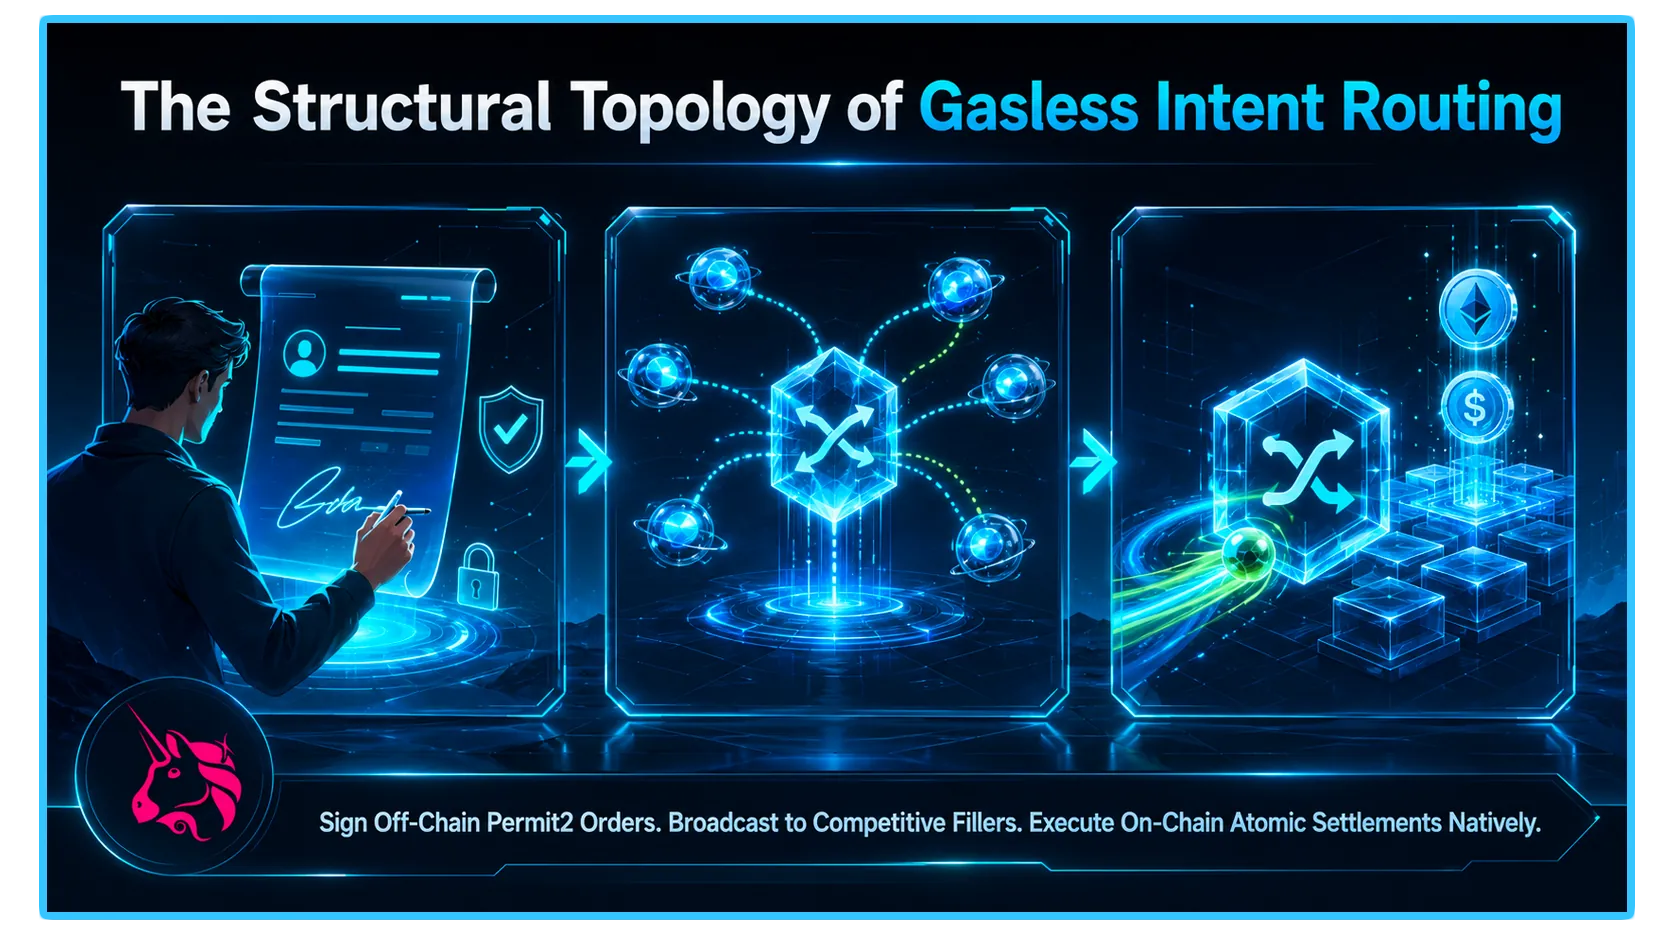
- To execute a swap on UniswapX without holding ETH, you must understand the paradigm shift from transaction execution to intent fulfillment. In a standard Uniswap V3 swap, you manually configure the exact pool routing path and broadcast a live transaction to the public mempool, paying a gas fee directly to network validators regardless of whether your trade succeeds or suffers a slippage failure.
- UniswapX abstracts this entire process using an intent-based architecture. Instead of building a hardcoded transaction, you sign an off-chain message detailing your specific economic desire: what asset you are giving up, what asset you want to receive, and the minimum acceptable output threshold.
- Once signed, your intent is broadcasted to a highly competitive, open-source network of third-party liquidity providers known as Fillers. Fillers use their own automated algorithms to find the most capital-efficient routing paths across alternative internal vaults, decentralized AMM pools, and private liquidity enclaves. The winning Filler executes the trade on-chain using their own wallet, covering the network's gas overhead entirely out of their own pocket.
2. The Engine Primitives: Permit2 and Dutch Auctions
The security and execution optimization of a UniswapX gasless swap relies on two core financial primitives working concurrently:
Permit2 Off-Chain Signatures
- The system logic that allows you to bypass gas expenses is powered by Ethereum's standardized Permit2 smart contract layer. Permit2 introduces low-overhead token approvals via cryptographic signatures.
- Instead of submitting a traditional, gas-intensive on-chain transaction to grant a protocol permission to spend your tokens, you sign an off-chain message using your private keys. The protocol can then securely parse this signature to move the exact allocation required for the swap, eliminating upfront gas requirements entirely.
The Dutch Auction Decay Engine
- To ensure users receive optimal execution pricing without manual negotiation, UniswapX processes orders using a Dutch Auction model. When your intent enters the market, it specifies a dynamic pricing curve that gradually decays over a brief timeframe. The pricing trajectory can be modeled using a standard linear decay function.
- Fillers monitor this decaying curve continuously. The exact millisecond the decay matches a price where a Filler can profitably execute your swap while covering the on-chain gas costs, they will instantly trigger the transaction to lock in the arbitrage spread, ensuring you get the best possible market execution.
3. Structural Comparison Matrix: Legacy vs. UniswapX
To maintain absolute clarity regarding how intent-based swapping re-engineers your transaction parameters, analyze the operational profiles organized inside this standardized layout:
| Swap Parameter | Standard AMM Swapping (Uniswap V3) | Intent-Based Swapping (UniswapX) |
| Gas Fee Source | Settled directly by the user via native wallet ETH | Covered entirely by external Fillers on-chain |
| Failed Trade Cost | Users pay gas fees even if the transaction reverts | Entirely risk-free; failed or unfilled orders incur zero fees |
| Slippage Protection | Exposed to predatory front-running and MEV bots | Sealed against MEV; Fillers absorb localized slippage risk |
| Routing Management | Hardcoded by front-end paths through static pools | Dynamically aggregated across on-chain and off-chain liquidity |
4. Step-by-Step Playbook: Executing a Gasless Swap
Step 1: Access the Interface and Activate the Protocol
Navigate to the official Uniswap Interface and anchor your preferred browser extension or hardware wallet.
Click the settings gear icon located in the upper-right corner of the swap module.
Locate the UniswapX toggle switch and ensure it is explicitly activated. When active, the interface will automatically route eligible token pairs through the gasless intent engine whenever deep Filler liquidity is present.
Step 2: Input Your Desired Token Parameters
Select your input asset (e.g., stablecoins like USDC or clean ERC-20 tokens) and specify your target destination token. Input the nominal quantity you wish to trade. The interface will automatically query the decentralized Filler network to display a live execution quote.
The Zero ETH Verification: Look closely at the transaction breakdown summary before finalizing. The gas fee parameter line will explicitly display as a solid $0.00 or Gasless, confirming that your native ETH balance will remain completely untouched during the execution loop.
Step 3: Authorize the Cryptographic Signatures
Click the primary Swap action block. Your wallet extension will prompt an initial pop-up interface window.
The Permit2 Approval (If Required): If you have never traded this specific token tokenomics layout through the Permit2 framework before, you will be prompted to sign an off-chain permission approval. This is a pure cryptographic signature request (not a transaction) meaning it requires 0 ETH to authorize.
The Order Signature: A secondary signature prompt will appear detailing the precise boundaries of your Dutch auction intent, including your maximum input value and minimum output threshold. Review the parameter arrays carefully and click Sign.
Step 4: Monitor Finality and Clearance
Once signed, your order is pushed to the public relay pool. The interface display will track the order state in real-time as Fillers actively bid on your position. Within seconds, a Filler will claim the payload, broadcast the clearing transaction to the host blockchain ledger using their own funds, and your newly swapped assets will manifest directly inside your private wallet folder concurrently upon block finality.
5. Technical Caveats: The First-Time Approval Exception
- While UniswapX delivers absolute gasless execution for the vast majority of day-to-day trading routes, you must account for a single technical bottleneck: The First-Time Approval Rule.
- If you are interacting with a brand-new wallet address that has never interacted with the Uniswap protocol, or if you are trying to swap a newly launched token that does not natively support EIP-2612 permit structures, the underlying ledger must execute an initial, classical on-chain approval to introduce the token tokenomics to the Permit2 master contract.
- This initialization step requires a standard, one-time native gas expenditure. However, once that baseline relationship is written to the blockchain ledger, every subsequent swap, modification, or cancellation executed for that specific asset class can be processed with absolute gasless finality using pure signatures indefinitely.
6. Real-Time Telemetry and Market Diagnostics via DEXTools
- Formulating a high-performance trading or arbitrage strategy using gasless intent routing requires continuous access to look-through, live data analytics. While UniswapX promises optimized execution parameters behind the scenes, verifying the actual underlying open-market liquidity pool thickness, real-time transaction velocity, and live token spreads across alternative decentralized venues is the only method to confirm if a Filler is providing a genuine institutional-grade quote or if your trade parameters are drifting into wide, unoptimized spreads.
- DEXTools provides the critical analytical data infrastructure needed to perform these diagnostic checks in real-time. By utilizing advanced cross-chain pair explorers, live transaction logs, and look-through wallet telemetry, market participants can independently monitor the structural health of any token market.
- Cross-referencing your automated intent setups with live blockchain metrics ensures your portfolio risk parameters remain fully optimized, allowing you to intercept sustainable algorithmic opportunities while keeping your wealth securely protected from hidden pool de-pegs or liquidity contractions across alternative layers.
You can access DEXTools here and start trading today!
Tags: UniswapX, Gasless Swap, Intent-Based Routing, Permit2, Dutch Auctions, Market Fillers, Token Approvals, Cryptographic Signatures, MEV Protection, Capital Efficiency, AMM Liquidity, Slippage Metrics, Smart Contract Architecture, Market Telemetry, DEXTools
Uniswap v2 vs v3 vs v4: Differences for Liquidity Providers What Are Gas Fees? How They Work on Ethereum and L2s How to Use Uniswap: Wallet Connect, Swap, Slippage and LP Basics What Is Uniswap? AMM, Liquidity Pools, Fees and UNI Token ExplainedDisclaimer: This article is for informational purposes only and does not constitute investment advice, financial advice, trading advice, or any other kind of advice. DEXTools does not recommend buying, selling, or holding any cryptocurrency or token. Users should conduct their own research and consult with a qualified financial advisor before making any investment decisions. Cryptocurrency investments are volatile and high-risk. DEXTools is not responsible for any losses incurred.